Budget Heating offers clear guidance for designing a reliable gaming room that stays cool during long sessions.
They focus on layouts that balance thermal load from high-performance gear with ergonomic choices. A thoughtful gaming setup links desk placement, lighting, and clear circulation paths to keep equipment safe and players comfortable.
When planning a compact space, they recommend treating the equipment and the person as equal priorities. Proper desk position and modest room zoning improve cooling efficiency and overall comfort for daily gaming.
Simple changes—from light placement to furniture orientation—can prevent overheating and make the area more inviting. The coming sections show practical layouts and tips to fit several setups into tight rooms while preserving performance and comfort.
Assessing Your Gaming Room Environment
Start by measuring the area you plan to use. Accurate length, width, and ceiling height let owners compute total volume for HVAC sizing. That basic figure guides every cooling decision for a reliable setup.
Room Volume and Envelope
Measure the room volume first and then evaluate the envelope. Check window orientation, wall insulation, and door seals. These elements determine how much external heat enters the space and the sensible load the system must handle.
Climate Classification
Identify the local climate: hot-humid, hot-dry, or cold. This classification tells whether latent moisture control or extra sensible cooling is critical.
- Account for heat generation: equipment and people add steady loads during long sessions.
- Position the desk and furniture to allow circulation around primary heat sources.
- Consider a pro assessment to avoid oversizing or undersizing cooling for your specific size and use.
Effective Small Gaming Room Airflow Ideas
Start by creating an unobstructed circulation path that guides conditioned air past the main desk and hardware. This simple change prevents heat pockets near high-performance components and keeps temperature steady across the space.
Keep the setup clear of vents. Ensure furniture does not block supply or return vents. A direct route for conditioned air improves ventilation and reduces hot spots during long gaming sessions.
Use vertical storage to lift peripherals off the floor and free the circulation plane. Taller shelving and wall mounts move equipment away from the lowest airflow layer and let cool air travel uninterrupted.
- Position the desk to face or sit beside the supply vent.
- Leave at least a clear meter behind large cases and consoles.
- Arrange seating and monitors so exhaust air flows out, not back into gear.
Adapt per space. Every gaming room needs a custom layout but the goal is the same: keep conditioned air moving away from the gear. Small tweaks to desk placement and storage deliver big gains in comfort and performance.
Choosing the Right Cooling System
Picking the right cooling approach begins with matching system capacity to the actual heat your setup produces. This ensures efficient operation and avoids the pitfalls of oversizing.
Ductless Mini Split Benefits
Ductless mini splits deliver targeted cooling for a gaming room and are ideal for high-heat equipment. They can be sized precisely for the load generated by modern PCs and consoles.
Installers can place indoor heads to avoid blowing directly on the desk or monitors while still keeping temperatures stable near primary gear.
Central AC Zoning
Central AC zoning lets owners maintain comfort in a single room without adding a second condenser. Zoning uses dampers and controllers to focus conditioned air where it’s needed.
“Variable speed equipment acts like a dimmer switch to hold setpoints tightly with minimal cycling.”
- Compare options: targeted mini split vs. zoned central systems.
- Size correctly: proper sizing preserves humidity control and efficiency.
- Plan placement: consider desk and equipment locations during installation.
Balance upfront cost and long-term efficiency to find the best solution for your space and budget.
Managing Heat Loads from Electronics
Add up the watts from each component to get a clear picture of the heat your setup will emit.
Conversion matters: use 1 W ≈ 3.41 BTU/h to turn device power into cooling load. A 600 W PC equals about 2,046 BTU/h. Two similar rigs plus occupants and lighting can push the total past 5,000 BTU/h.
Calculating BTU Loads
Follow a simple checklist:
- List every PC, monitor, and display and note wattage.
- Convert watts to BTU/h (W × 3.41) and sum the results.
- Add people and lighting estimates to get a final sensible load for the room.
Proper placement helps. Ensure the desk allows vents behind monitors and leaves space for exhaust paths. Good placement prevents heat pooling behind a screen and extends the life of expensive equipment.
“Accurate BTU calculations help select a cooling solution that keeps the space comfortable during long gaming sessions.”
Minimizing Noise for Immersive Sessions
Noise control matters as much as cooling when creating a quiet, focused setup. Aim for 30–35 dB(A) at the seating and microphone position so fans and compressors do not mask voice or game audio.
Start with ductwork and unit placement. Proper duct design and distance from the desk reduce hiss and low-frequency rumble. They should route noise away from the primary seating area.
Vibration isolation is an easy, high-impact fix. Use pads under PCs, consoles, and fan mounts to cut transmitted vibration that the microphone will pick up.
Plan monitor and desk placement to avoid turbulent vents or direct blower paths. Small shifts in position often remove audible whines without sacrificing cooling performance.
- Target noise: 30–35 dB(A) at the seating position.
- Use vibration pads: under equipment and mounts.
- Add acoustic treatment: panels, bass traps, and diffusers near the screen and mic.
A low-noise design elevates the entire gaming room experience. Combine quiet cooling gear with basic acoustic treatment for long, immersive sessions free from distracting mechanical sounds.
Optimizing Airflow with Strategic Vent Placement
A well-planned vent layout directs supply and return paths to avoid hot spots near displays and cases.
Supply Vent Positioning
Place supply vents low on a wall so cool air moves across the desk and under the monitor. This helps conditioned air wash over heat sources without blasting the player.
Return Air Strategies
Install high return vents near the ceiling to capture rising heat from screens and PCs. This pulls warm air away and keeps temperature consistent across the space.
Fresh Air Ventilation
ERVs or HRVs add conditioned outside air during long sessions and improve air quality in a compact area. They also prevent stale pockets that can form behind walls and equipment.
- Ensure the desk and monitor do not block vent paths.
- Consider vent placement on opposite walls to promote cross circulation.
- Place vents relative to seating to avoid direct drafts while maintaining comfort.
For more detailed fan and vent layouts, review this fan layout guide to refine placement by size and setup.
Humidity Control and Air Quality
Keeping humidity in the 40–60% range and temperature between 68–75°F supports both hardware stability and player comfort in a gaming room.
Consistent humidity prevents lens fogging and reduces the risk of static discharge that can interrupt play or damage sensitive components.
If the main cooling system cannot hold the setpoint, adding a dedicated dehumidifier improves the air quality of the space.
Arrange the desk and monitor to allow clear circulation near heat sources. This helps HVAC equipment manage moisture more effectively and keeps air moving away from electronics.
- Route condensate drains safely so water never pools near the PC or peripherals.
- Monitor temperature and humidity with an inexpensive sensor to catch excursions early.
- Use a dehumidifier or ERV/HRV if long sessions cause indoor moisture to rise.
“A balanced environment with the right temperature and humidity creates a more reliable and enjoyable gaming experience.”
Regular checks and simple adjustments keep the room healthy and the setup reliable for long-term comfort and performance.
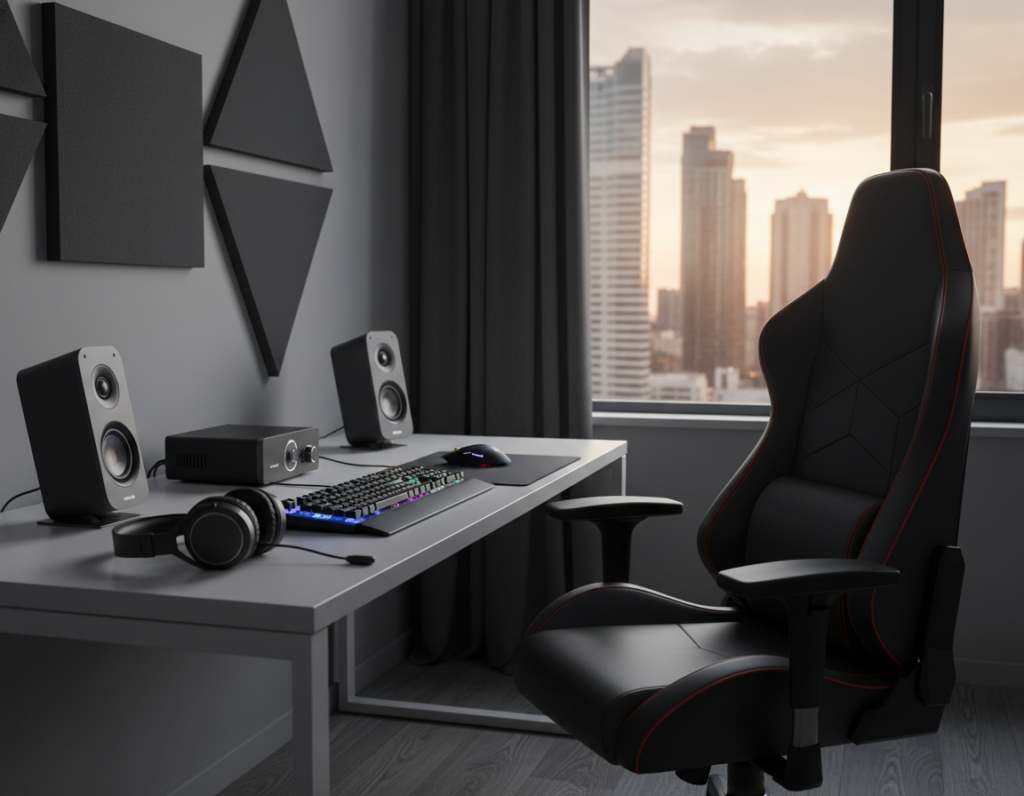
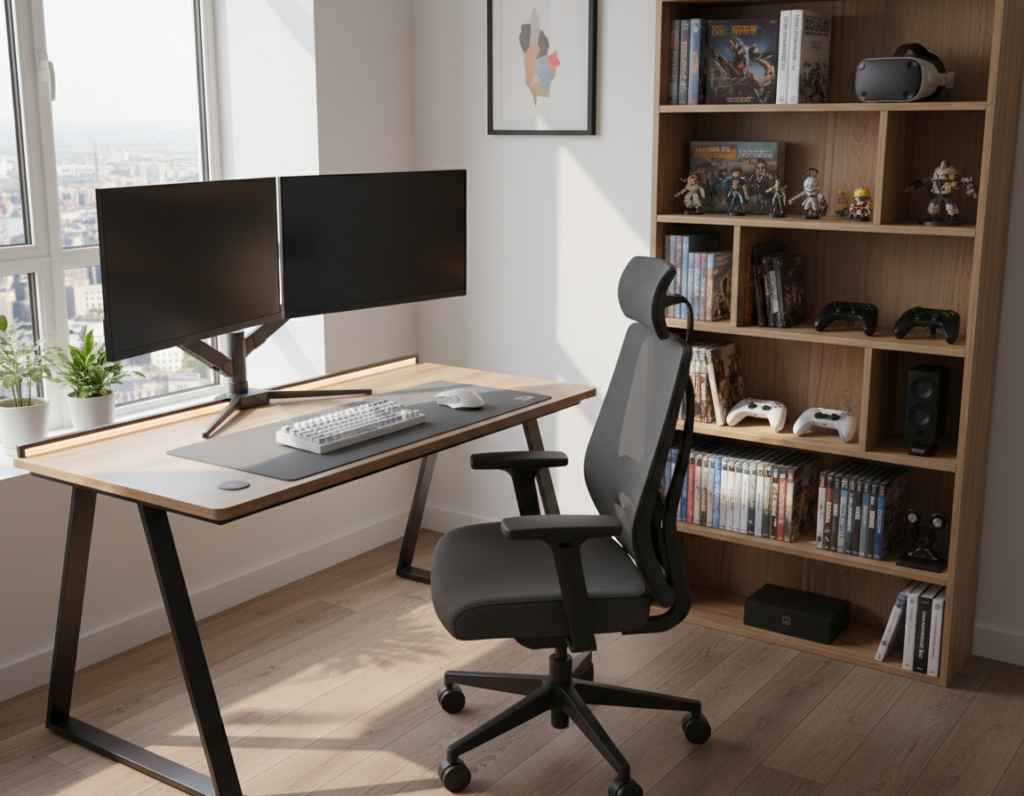
Selecting the Best Furniture for Air Circulation
Choosing furniture that supports circulation can make a big difference in comfort and equipment longevity. Proper pieces keep vents clear and let conditioned air move across a desk and monitor bank.
Corner Desk Layouts
A corner desk is an efficient way to open up the floor and define an area for a gaming desk and accessories. It gives room for a large monitor and still leaves paths for supply and return vents.
Ergonomics matter: over 35% of players report discomfort from long sessions, so a chair with lumbar support is essential. Good posture reduces fatigue and supports longer, healthier play.
- Floating shelves free the floor and keep games and decor off the ground, improving circulation.
- A smooth desk surface with space for keyboard and mouse ensures a consistent setup and less clutter.
- Choose storage that hides cables and accessories so vents stay unblocked and the area stays tidy.
By matching furniture to style and function, they create a durable, comfortable space that preserves cooling and extends component life.
Cable Management for Improved Ventilation
A neat cable layout helps conditioned air reach hardware instead of getting blocked by cords.
Effective cable management is an easy step that improves ventilation around a PC and gaming desk. Use cable trays and braided sleeves to route power and data lines away from vents and the back of the monitor bank.
A clean wall behind the desk improves style and lets air move freely. Mount power strips and a few storage accessories on the wall to lift cords off the floor and out of circulation paths.
Bundle cables with Velcro or labeled sleeves to cut clutter. This also makes cleaning faster and reduces dust buildup that can harm components during long play sessions.
Professional-looking wiring protects equipment and keeps the setup tidy. Every gaming room benefits from a simple, repeatable cable plan that keeps vents clear and the space functioning efficiently.
- Route power away from return vents.
- Use trays under desks and mounts on walls.
- Label and bundle for quick service and cleaning.
Lighting Solutions That Reduce Heat
LED fixtures and smart strips cut heat output while giving the space precise control over brightness and color. These options replace older bulbs that add unwanted sensible load near electronics and furniture.
Bias lighting behind the monitor eases eye strain and balances screen brightness with ambient lighting. This reduces the need to raise overall brightness levels, which in turn lowers heat from lamps and fixtures.
Bias Lighting Benefits
Modern LED strip installations use low-wattage diodes that emit very little heat. They are ideal for highlighting walls, shelves, and desk edges without adding thermal stress to equipment.
- Smart LED strips let users dim or change color remotely to match the mood without turning on heat-producing lamps.
- Use a mix of ambient and task lighting to keep the floor and desk well lit while protecting the screen contrast.
- Highlight wall decor and storage with strips to create style and depth while staying energy efficient.
“Proper lighting placement, including bias lighting, is a key part of any well-designed setup that prioritizes both comfort and aesthetics.”
For more curated design suggestions, review these gaming room ideas to pair LED choices with furniture and accessories that fit the space.
Budget Friendly Upgrades for Better Comfort
A few targeted upgrades can lift comfort and style without blowing the budget. Start with a quality desk mat and LED strips to create consistent bias lighting and a cleaner surface for mouse and keyboard.
Swap the chair or upgrade the desk when possible. An ergonomic chair and a stable gaming desk reduce fatigue during long sessions and protect posture.
Improve storage with vertical shelves and under-desk trays to free the floor and keep cables tidy. Better storage also improves ventilation around monitors and cases.
Add small accessories—monitor stands, a desk mat, tasteful decor, and a plant—to increase comfort and personalize the space. These changes deliver style and function on a modest budget.
“By prioritizing a few high-impact upgrades, anyone can build a high-quality gaming room that fits their budget and play style.”
- Lighting: LED strips and bias lighting lower heat and improve contrast.
- Desk & chair: Focus on ergonomics for long-term comfort.
- Storage: Shelves and trays keep the floor clear and gear accessible.
Essential Maintenance for Reliable Performance
A deliberate maintenance schedule is the backbone of any reliable setup. Regular care keeps equipment and environmental systems working together to deliver steady performance over time.
Filter Replacement Schedules
Replace HVAC filters monthly in heavy-use gaming rooms. This simple habit preserves system capacity, reduces strain on compressors, and keeps vents clear so conditioned air reaches the desk and seating area.
Cleaning PC Components
Dust restricts fan intake and raises temperatures inside cases. They should vacuum dust from vents, heatsinks, and filters on a regular cycle to preserve performance and extend hardware life.
“A clean setup is a more efficient setup; invest time now to avoid repairs later.”
Practical checks include inspecting cables, testing fans, and confirming storage and shelves do not block returns. Keep the floor tidy and move accessories away from vents during cleaning.
- Monthly: HVAC filter replacement and quick dust wipe.
- Quarterly: Deep PC vacuum and fan lubrication if applicable.
- Ongoing: Visual checks of desks, chairs, and hardware for wear.
By dedicating time to maintenance, owners protect performance and keep their gaming setups comfortable and reliable.
Professional Installation and Commissioning
Commissioning by a licensed specialist confirms the design matches real-world conditions and load. They check duct layout, control settings, and safety interlocks to meet performance and safety standards for the gaming room and surrounding area.
A certified technician reviews the setup and recommends cooling options that suit the room design and your budget. During commissioning they verify airflow, temperature split, and system balance so the equipment and seating stay comfortable during long sessions.
Proper installation prevents common faults. A professional reduces risks like refrigerant leaks, wiring errors, or incorrectly sized components that could interrupt games or harm hardware.
- Peace of mind: a reliable system reduces downtime.
- Optimized performance: matched controls, vents, and thermostat settings.
- Long-term value: professional commissioning protects budget and gear.
Whether choosing storage, furniture, or accessories, every detail benefits from a professional touch. They ensure the design, style, chair placement, and decor support both comfort and equipment longevity.
Conclusion
A cohesive plan blends layout strategy, targeted cooling, and tidy storage to protect gear and comfort.
They should focus on practical choices that keep hardware cool and accessible. Good storage and neat cable routing free vents and make maintenance easier. Simple decor choices add personality without adding heat.
Prioritize thermal needs and routine checks to avoid surprises during long sessions. Implement the described layout ideas and upkeep habits to keep the area quiet and reliable.
With smart storage, modest decor, and consistent maintenance, owners get a durable setup that supports play and preserves expensive equipment.